HTML & CSS Tutorial
A walkthrough guide for coding and creating your own site.
Getting Started
In this section you will be downloading a zip file containing two template documents. Our tutorial will guide you through understanding what these two documents are, the purposes they serve, and how they work in tandem to form the backbone of your personal portfolio site. Take a moment now to download the file yournamehere-template-main.zip. We suggest you save it in your home directory or your documents folder. This will be your starter kit and you will edit it through Visual Studio Code.
In the sections that follow, you will use the documents from your starter kit to begin the journey of building your own personal website. The operative word here is journey. Please work at your own pace and feel free to grow your website at whatever pace it takes for you to learn the technical skill we will teach you here. Most importantly, remember that this is also a space to have fun, to tinker, to learn through trial and error, and to embrace mistakes as a learning opportunity.
Websites are made of individual web pages and pages are stored in files, just like the files that live on your computer. The content of pages exist on your computer under the file extension, .html. A file extension is a standard way to indicate what kind of information a file contains so it can use the right software to read and write them. You are likely familiar with .doc or .pdf files. In these cases, your computer probably displays the information in Microsoft Word and Adobe Acrobat or Preview for Mac users, respectively. In the case of .html, these files will open on your default web browser. This is Google Chrome for us, but might also be Firefox, Safari, or Edge for you.
In the example you see below, the column on the left is called a code block. It is what the html template in your starter pack looks like and what your webpage looks like "under the hood". The column on the right is what that file looks like when opened on your default browser, a simple webpage. Simply put, an .html file contains the basic text and structure of your website. The .html files are often named by standard conventions. The most common name used for the default or home page of a website is index.html. This is one of the files included in your starter pack.
See the Pen index.html Example by shushine (@shushine-the-typescripter) on CodePen.
The second file included in your starter pack is a style.css file. CSS stands for "Cascading Style Sheet" and this type of file is used to “style” the contents of an associated webpage. This .css file works in tandem with the content contained in an .html file to describe the presentation of that content. Think of your HTML document as laying out the text and structure of your page while CSS describes how that text is interpreted by the audience’s senses. Presentation encompasses how a page in a web browser or assistive technologies like screen readers should interpret the text. It is where you will define, among other things, the font and background color of your website, how the text is laid out, and how emphasis is emphasized. The standard naming convention for a Cascading Style Sheet is style.css.
Part I: HTML
A Quick Primer
Before we talk about specific HTML code, a quick primer on how to read HTML will be useful. HTML makes use of what are called elements, tags, and attributes.
- Elements are the fundamental building blocks of an HTML page, and they are used to define the way in which particular content looks or functions. Elements are composed of tags, attributes, and content.
- Tags are used to indicate the way in which you want to structure particular content. A tag often appears in pairs with an opening and a closing tag, although this is not always the case (e.g., the image tag). If you want text to appear as a paragraph, for example, you would use the
<p></p>tag, and you would write out the code as follows:<p>text content</p>. - Sometimes the opening tag (the first tag of the pair) might have a modifier to further explain the way in which you want the tag to function. This modifier is called an attribute. You will see attributes used in the case of link and image tags, for example. We speak at more length about these two tags below, but just to help you get a clearer sense of an attribute, here is the code to embed a link onto a web page:
<a href=“brackets.scholarslab.org”>Your Name Here</a>Thehref, here–which is followed by the url–is the attribute. It modifies the anchor tag<a></a>by specifying the exact url you want to link to. - It is also important to note that when writing code, case matters, as does spacing. So,
style.css,Style.css,Style.CSS,S tyle.css,S_tyle.cssare all different. It is considered best practice to avoid spaces as much as possible.
This Mozilla developer webpage is a great primer on HTML, if you would like to explore further.
It can often be fun, gratifying, and helpful to be able to see the code you write update your webpage in real time. You can keep a track of the changes to your webpage and see how your code functions by opening the index.html file in your web browser. In order to do this, either double-click on index.html in Finder/File Explorer or type the following command in the terminal: open[space]index.html
Opening Boilerplate Code
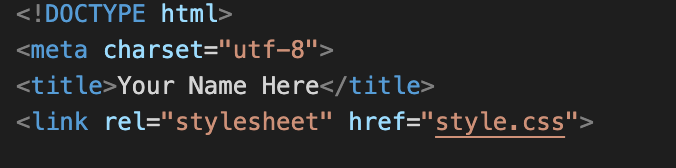
This is boilerplate code which comes at the top of your HTML file. Information and code included here works behind the scenes of your webpage. There are many templates for this boilerplate code which you could copy and paste as is; for example, you could use the code included in the template we have provided you and just change the text enclosed within the title tags to reflect your website name. Here is another possible template you might choose to use. Most of this code is pretty routine. W3 Schools provides a more detailed explanation of the function of each attribute and tag used if you are interested.
One note on the fourth line of code: that line of code references the CSS file you will be creating and which will work in conjunction with the HTML file to finally create your webpage. The text included in quotation marks after href (style.css) is the name of the CSS file. While you can name your CSS file however you choose, style.css is most conventional. Basically, CSS stands for "Cascading Style Sheet." Coding with CSS will help style the content in your HTML document. CSS describes how the elements in your HTML document should be displayed, and helps specify elements of the web page such as typography, color, and sizing. Think of your HTML document as laying out the basic bones of your web page while CSS gives it its distinct appearance and look.
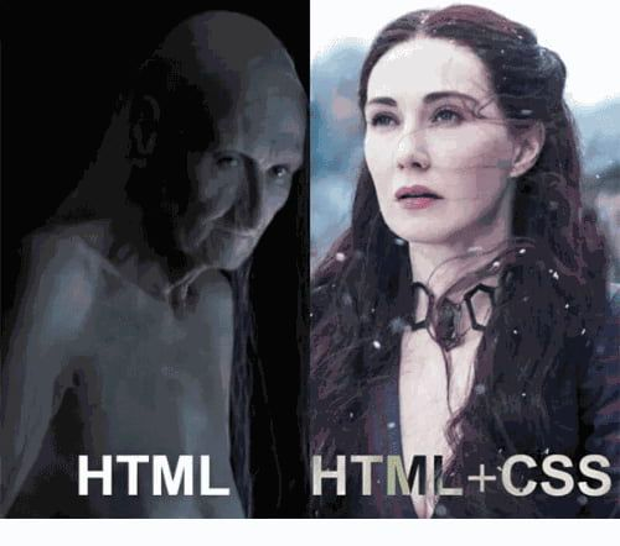
Consider these two memes which we think capture how CSS works with HTML to give your webpage its look and appearance.
Header, Headings, Main
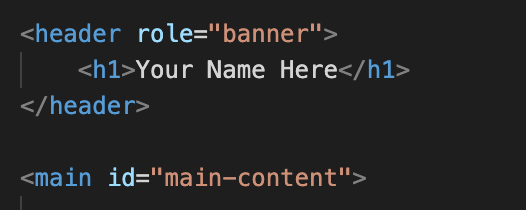
<header></header>: Information included within the header tag forms the introductory content for your webpage or can include navigational links to other parts of your website. For example, here, within the header tags, we are specifying the “banner” for our webpage (hence, role=“banner”). In other words, we are specifying the title of our webpage which will be visible at the top to any visitor who comes to the page.
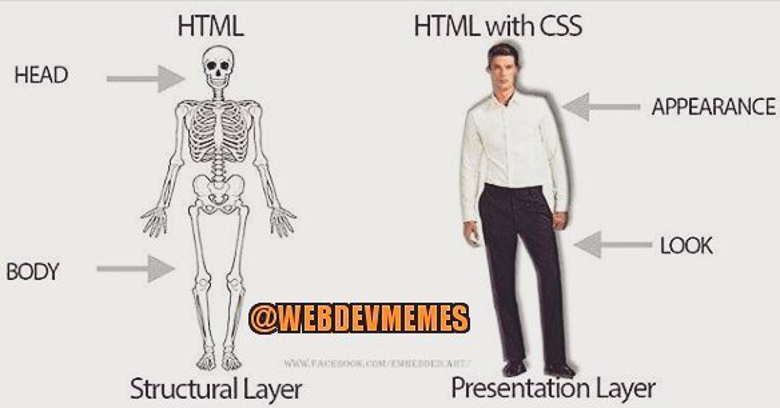
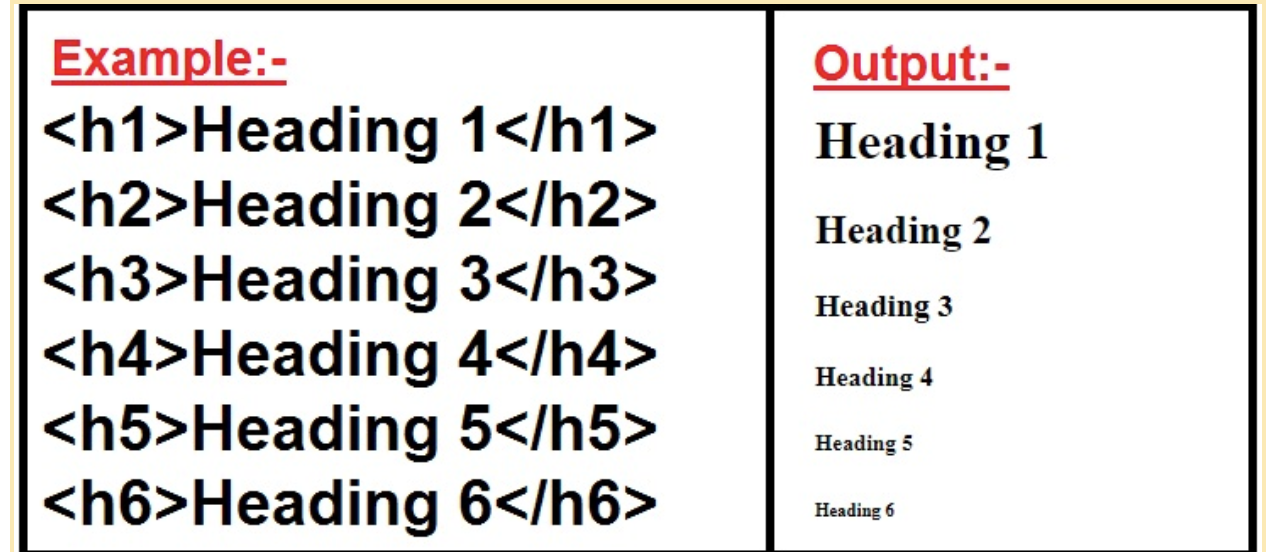
<h1></h1>: These are heading tags. Headings range from <h1> to <h6>, with <h1> being the most important and <h6> being the least. As this Mozilla page helpfully explains, think of these tags as defining headings and subheadings, such that <h1> gives the title of the book, with subsequent heading tags defining chapter titles, section titles, sub-section names, so on and so forth. Generally, a web page will make use of only one <h1> tag but could use multiple <h2>, <h3>, etc. tags depending on the organization of information and sections on the page.
This image might help understand this better:
<main></main>: Content enclosed within the main tags refers to the main content of the webpage; think of it as the body of the document. This content can then be subdivided into sections as we have done in the template provided.
Section I: “A Welcome Note”
We have chosen to call this section “A Welcome Note.” On most personal portfolio websites, this would be akin to a "landing" or an "about me" page where you might choose to introduce yourself to visitors who stop by your website. You do not have to define yourself solely, initially, or primarily in terms of your institutional affiliations and academic achievement. Do with this description as you will. Perhaps you might take inspiration from the writing prompts we’ve shared in the “Individuality and Solidarity” section of the [Your Name Here] website.
Another function of this section (or you could make a separate section) is to welcome visitors in a way that readies or positions them to receive the content you’ve laid out on your page. Here, we take inspiration from Angela Balduzs's beautiful webpage which opens with a short letter to her visitors.
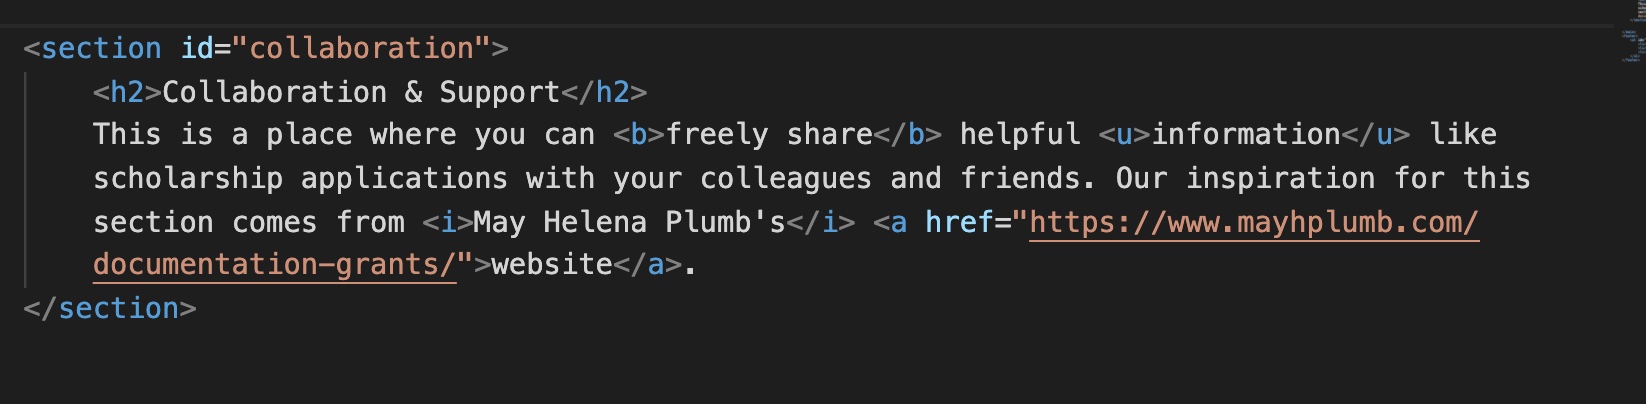
Now let’s talk about some of the technical things happening in this section. Refer to the screenshot below as you read the following.
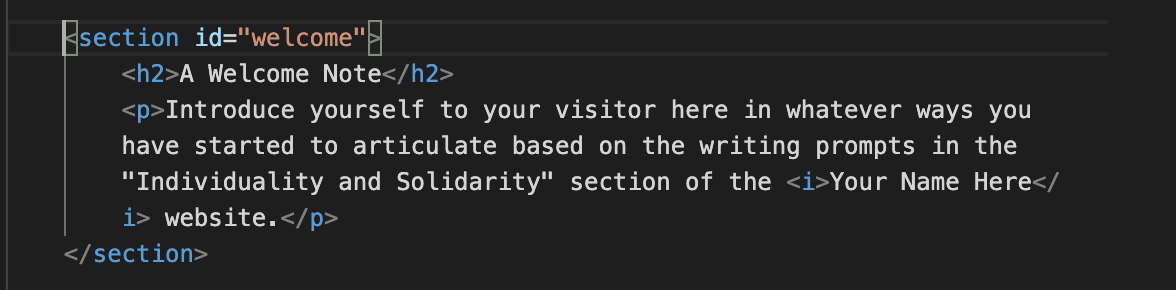
<section></section>: Section tags will encompass all that goes into creating this particular section of your page. The utility of enclosing the content of a particular section in these tags is that if you want to style solely one section, you can easily refer to the section using the section id (here, “welcome”) included in the opening<section>tag in, for example, the CSS file you create. We will say more about styling in the CSS section later. Just a note that this ID will not be in any way “visible” on your live webpage.<h2></h2>: These tags are a kind of header tag. The text you enclose within these tags will be displayed on your webpage. These tags are useful when setting off sections and giving them titles. We have already spoken about header tags earlier when discussing the<h1></h1>tags.<p></p>: These are paragraph tags. Text included within these tags will appear as a paragraph on your webpage. If you want text to appear in separate paragraphs, enclose each chunk within its own paragraph tags.<i></i>: These are italics tags. Text enclosed within these tags will appear in italics. “Bold” and “underline” are other forms of emphases you can format text with, and we will be discussing these emphases tags in a later section.
Section II: “Scribblings, Ramblings, and Musings”
We have chosen to title this section "Scribblings, Ramblings, Musings". Others might choose to limit this section to a list of academic publications. We have chosen to define this space in a capacious manner so that you can feel to include other types of work and collaborations that might otherwise be less valued in traditionally narrow tenure file rubrics. While we celebrate academic publications as important accomplishments you should feel welcome to include other things you have created. So go ahead, include a list and link to blog posts, short stores, knitting patterns you've published, or even any computational code you have composed.
After all, your website doesn't have to mimic the taxonomy found in your academic CV. We also recognize that for many graduate students, publishing in top-tiered peer-reviewed journals is a process rife with many challenges and a high barrier for entry. This can be attributed to a myriad of factors such as crippling imposter syndrome and a lack of time and resources attributed to disproportionately heavy teaching load, limited financial support, a lack of faculty or institutional support or hidden curriculum. It also takes time to develop and trust your voice. And we recognize that some people might also have an ethical commitment to publishing in open access journals or publication venues that extend the conversation beyond our academic chorus to a more general public.
On to the task at hand. In this section we are going to show you how to create two different types of list: unordered and ordered lists. Simply put, these two types of list refer to bulleted or numbered information. To create a bulleted or numbered list on a word processor you simply click an icon in your toolbar. You can also do this using HTML. Let's look at the following example.
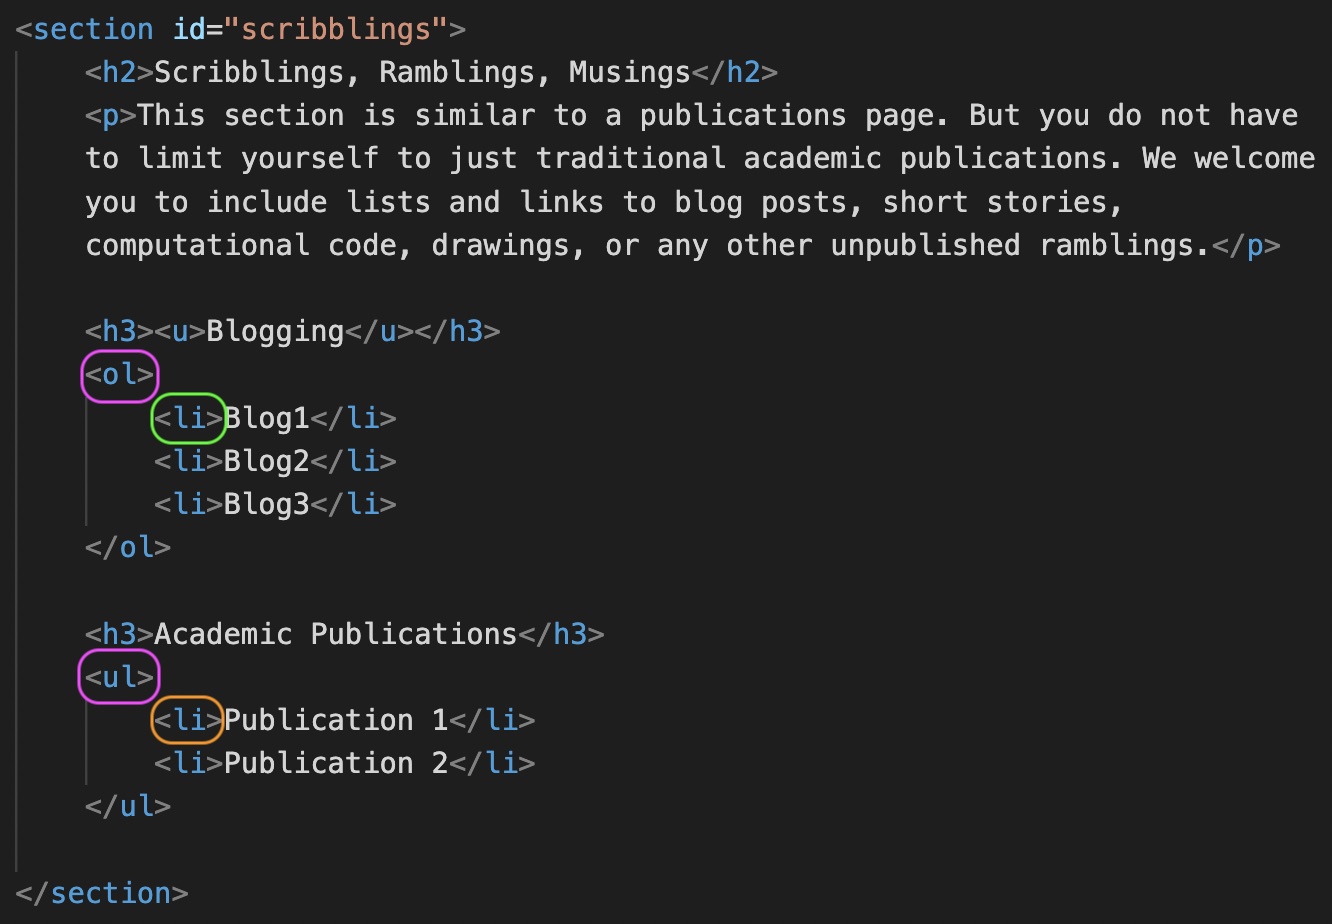
In this code block you are looking at the "Scribblings, Ramblings, Musings" section of your webpage. Notice how under the <h2></h2> section heading there are two subsections, Blogging and Academic Publications. Each of these subsections contains a list nested within two tags.
<li></li>: These tags are used to indicate that the text which it contains will appear in the form of a list. But what kind of list? Do you want that list bulleted or numbered? To do this, the<li>tags must be embedded within one of two other "parent" elements. These elements are as follows.<ol></ol>: These tags stand for ordered list. These tags are use to indicate that the list you are creating is a numbered list. To create an ordered or number list, indent and embed thelielements with these tags. Ensure that the opening and closingol"parent" tags appear along the same margin and that the embedded and indentedlielements appear one after the other.<ul></ul>: These tags stand for unordered lists. And if you hadn't already guessed they create a bulleted list. An unordered list is formatted in the same way you create a ordered list. To created a bulleted list, indent and embed thelielements within these tags. Ensure that the opening and closingul"parent" tags appear along the same margin and that the embedded and indentedlielements appear one after the other.
Section III: “My Surrounds”
This probably feels like a lot of complicated code, especially for those of us who are first time coders. Worry not, though – we’re going to break it down for you. Before we do that, though, let us talk a little bit about this particular section and why we chose to include it here.
As we have been saying repeatedly, the academic space expects us to perform and portray a particular self – that of the consummate professional and intellectual. And the personal portfolio website is often made to function in service of this task, like a calling card extolling your professional self and achievements. However, who says that your personal website can/should only include a professional mugshot on the home page, your institutional affiliations, your published works, and your CV? This particular section – “My Surrounds” – invites you to bring to the fore things – books, movies, recipes, songs, images – which have been sparking joy for you, things which have been thought provoking, interesting, enticing, fun – literally anything you have been engaging with and want to share. After all, these are just as interesting and formative a part of you as your more scholarly pursuits.
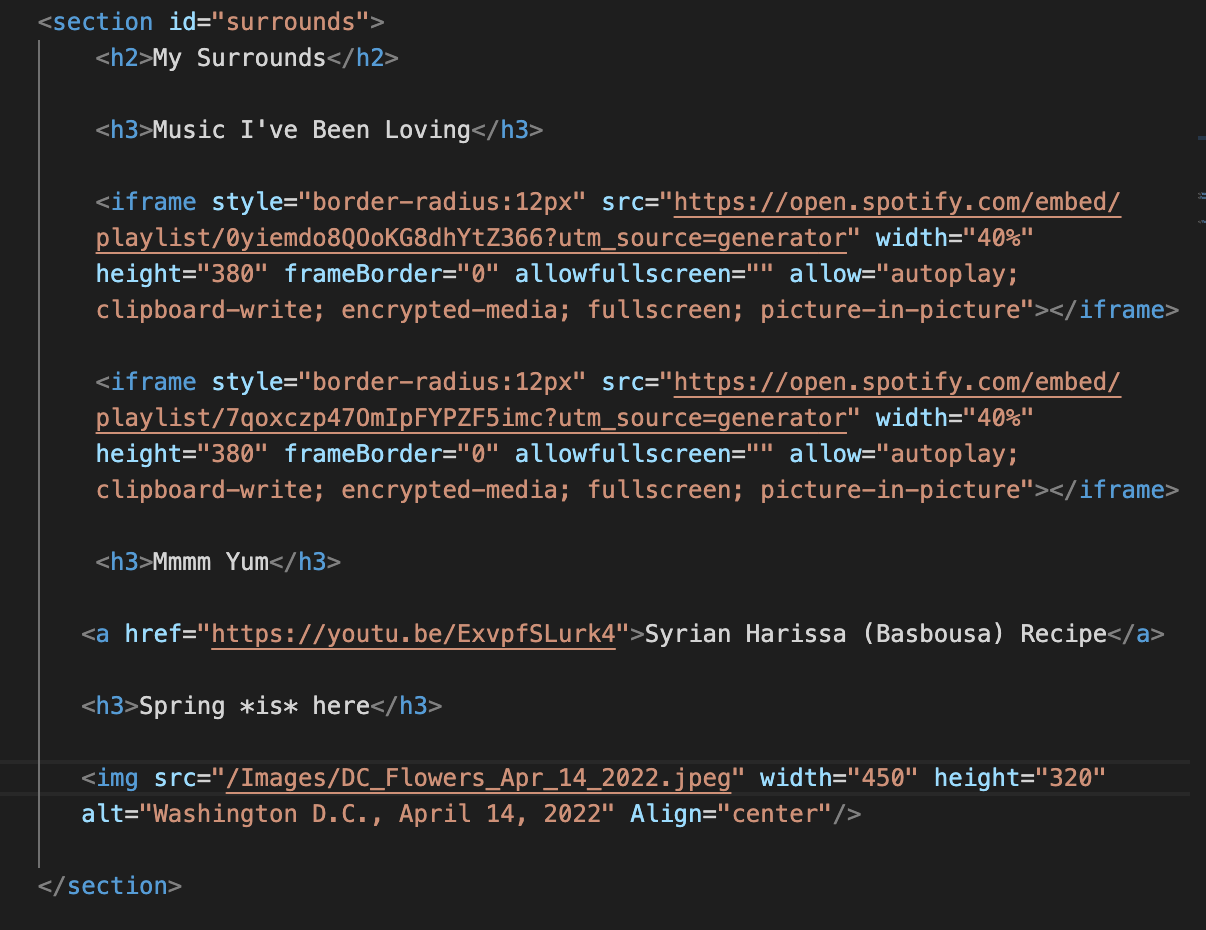
Now, on to understanding the code. We have already spoken about the section and heading tags. Some of the new tags we have introduced here include the following:
<iframe></iframe>: These tags open up a little window inside of your page to another page on the Web, often to “embed” content from other sites. Here, it is the tag we have used to embed some of our favorite Spotify playlists on the webpage. If we are being completely honest, we did not write this code ourselves! Spotify did it for us. If you hit the share button on a song or playlist you would like to share, the embed option will come up (this also the case for YouTube videos, for example). Just copy the code Spotify displays and paste it. You are all set now!<a href></a>: This tag is used to embed links; here, we have linked to a YouTube video of a Syrian Harissa recipe. The URL of the link you want to embed is included within quotation marks after the “=” sign followinghref. The text you would like to hyperlink (here, “Syrian Harissa (Basbousa) Recipe) comes in between the opening and closing tag.A good practice to keep in mind is not to use text such as “click here” which you then hyperlink; descriptive text is better. Text like “click here” is generally bad from the perspective of accessibility and is not parsable for those who use screen readers.
<img>: This tag is used to embed images on your webpage. Here is a very helpful, detailed explanation of the image tag. Summarily put: the file name aftersrcis the name of the image file (srcstands for source); width and height are used to specify image dimensions;altis used to specify the alternate text you want to appear if someone hovers over the image (this is great for accessibility and inclusivity); andalignis meant to specify the positioning of the image on the webpage. A note: unlike many other tags, the image tag does not come in a pair; that is to say, all this information is enclosed within the greater-than-less-than carrots aroundimgrather than being enclosed between<img></img>.
Section IV: “Collaboration & Support”
Our first time using HTML/CSS was just 6 short months ago. Although tags like italics — <i>letter/word you want in italics</i> — are as simple as you will find within this language, we are still memorizing the basics. Fear not, these skills will come with time. Whether it takes 6 months, or 6 years, you’re moving in the right direction. For us, we also learned the basics from a template just like this.
Throughout the process of creating this project and looking at other academic and personal websites, the individuals that freely shared helpful information is what really resonated with us. Although concepts like open access, collaboration and support are often embraced within digital humanities, those sentiments are more rare within academia. This section — “Collaboration & Support” — is encouraging you to embrace this community spirit by openly sharing things like successful scholarship applications, or even a class syllabus.
Keep in mind, using this header (“Collaboration & Support”) is completely optional. You might find that something more traditional and straightforward like — Successful Scholarship Applications — better suit your needs, you might invent something else, or you may skip this section entirely. Whatever the case, you can walk away from this section confidently understanding emphasis tags.
Now, on to understanding the code. We have already spoken about the section and heading tags. In this section, we will breakdown emphasis tags, which include: bold, italics and underline:
- To make letter/word italic you will type:
<i>letter/word you want in italics</i> - To make a letter/word bold you will type:
<b>letter/word you want in bold</b> - To underline a letter/word you will type:
<u> letter/word you want in italics</u>
Footer
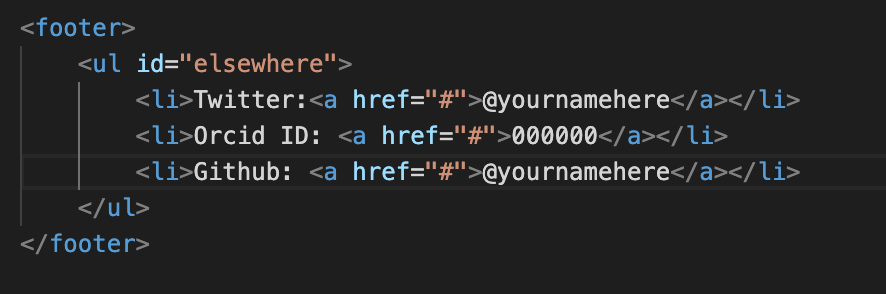
The footer section can be viewed as a counterpart to the header section. The material enclosed within the <footer></footer> tags is what you would want to display at the bottom of your webpage, akin to the footer of a word document. Some common items often included in the footer are: copyright information; contact information; and links to allow visitors to navigate back to the top of the webpage. Here, we have included different IDs and tags which would allow visitors to the page to engage with or contact us.
You have already encountered the other code used in this section above: unordered lists; list items; and link tags.
Part II: CSS
If you have been opening your index.html file on your web browser, you will see that it looks quite simple–black text on a white background. This is because web browsers have in-built default styling which makes content appear the way it does. In order to modify the presentation and appearance of your webpage, you will use CSS. Download the style.css file, and make sure that it is in the same folder as the index.html file.
The fourth line of code included in the header of your index.html file will make sure that the style.css file you have downloaded will be integrated into your webpage. To check, refresh the webpage on your web browser – it should look different now! As you modify this template to more closely align with your design goals and aesthetics, you might find it useful to refer back to our Design Ethos page.
Let’s talk about the technical aspects of the code now. This Resource for Developers by Mozilla is a great primer. Here, we will highlight some of the key aspects you will need to keep in mind.
Just like in the case of HTML, it is important to first learn how to read the CSS. CSS code is composed of rulesets (or rules). The ruleset is composed of a selector and a declaration. Everything included in the screenshot below comprises a ruleset. Let’s break down the individual elements.
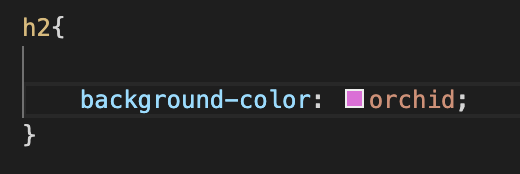
- Selector: The selector is the name of the HTML element you would like to style; it opens the ruleset. Here, the selector is
h2. - Declaration: The declaration is composed of two elements – property and property value. Property refers to that attribute which you want to modify (here, background color) and property value refers to the option or value you want to assign to the property (here, the color “orchid”).
- When writing out CSS, there are a few syntax rules to keep in mind:
- The declaration (property + property value) are enclosed within curly brackets.
- The property and property value are separated by a colon.
- You can have multiple declarations within your curly brackets each of which are defining different stylistic properties (as we do in the case of the code associated with the selector “html” in the template we have provided). Each of these declarations should be separated by a semicolon and should, for the sake of clarity, be on a new line.
Now let’s look at the CSS code provided in the template as a whole.
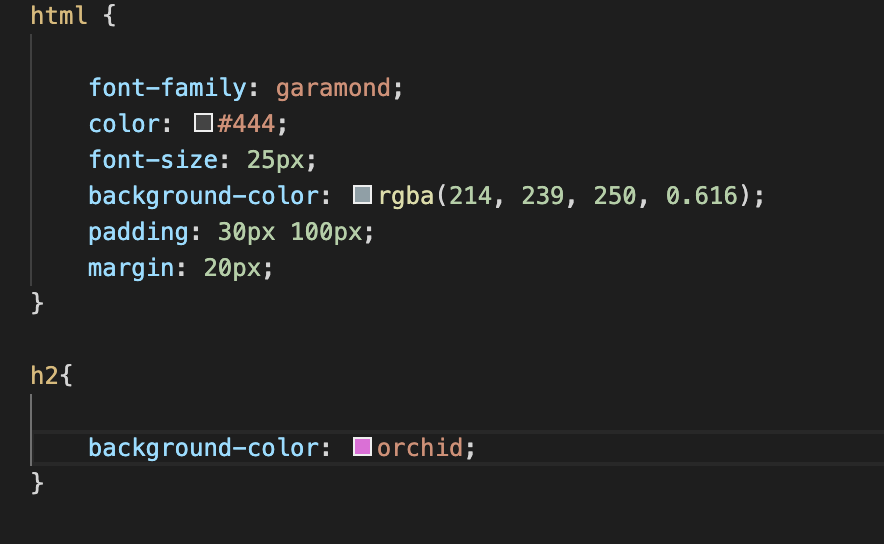
CSS allows you to lay out a hierarchy of properties and values. For the most part, your computer will read CSS from top to bottom and whichever is the last definition it encounters, that is the way it will encode your webpage. This principle or rule is called "cascade". Does that sound familiar? Remember what CSS stands for? We'll give you a moment. Yep, CSS stands for Cascading Style Sheet, and this is precisely what is meant by Cascading.
In our template, there are two selectors: html{ } and h2{ }. While the properties in html{ } apply to the entirety of your HTML content, you can target specific sections of your webpage using a variety of selectors. h2{ } is one of the selectors that you can use. Here, we have defined a background color for the h2 elements of your HTML document which is different from the rest of the content. Because the h2 selector comes after the HTML selector, your computer will use this latest bit of code to format the h2 elements of your webpage. This means that the background color for the h2 elements will override the color specified within the HTML selector for your level 2 headings.
What might be different, or at least not immediately familiar, are the margin and padding properties. This blogpost written by Jamie Juviler provides a great explanation; to quote him: “In CSS, a margin is the space around an element’s border, while padding is the space between an element’s border and the element’s content. Put another way, the margin property controls the space outside an element, and the padding property controls the space inside an element.” A pretty handy feature of VS Code is that as you begin coding your stylesheet, it will show you options for properties and property values that you might want to play with. Of course, as mentioned earlier, there are great options available online, and we particularly like this Mozilla page for Developers.
Experimenting On Your Own
So far, we have walked you through some of the very basic elements of HTML and CSS using a pre-designed template. The aim of this was to encourage you to experience coding in a more accessible, welcoming manner. Now that you have had a feel of it, we hope you would want to experiment and play with code on your own. To that end, we want to highlight a few things you might find useful:
Creating HTML and CSS pages from scratch
While we gave you sample HTML and CSS files to play with, it is useful to know how to create these files from scratch as well.
- First, create a folder for your project somewhere on your computer. The location doesn't matter, it just needs to be somewhere accessible to you. This one folder will be a container to hold all the documents, files, and images which will go into the making of your website. In order to create a folder, enter the following command in the terminal–either in the default terminal application on your computer or via VS Code:
mkdir[space][folder name].mkdiris shorthand for "make directory"; when coding, directory is another way to refer to a folder. - Within that folder, you are going to create your HTML and CSS files. Just a reminder: make sure your files are in the same folder! You can create the file by entering the following command in the terminal:
touch[space][name of file].- Name the first file, which will be your homepage/landing page,
index.html. - Any subsequent files will correspond to other pages of your website. For example:
resources.htmlorteaching.html - The next file you create will be a "Cascading Style Sheet" or CSS file. Name this file
style.css.
- Name the first file, which will be your homepage/landing page,
Inspect Element
A pretty handy tool is “Inspect Element.”
- If you visit any website and double-click/right-click on the page, a drop-down menu will appear.
- Click on the “Inspect” option.
- A pop-up window will appear which will show you everything that is going on under the hood of that web-page; i.e., the code that has gone into making the site what it is.
- If you like particular elements of that page, you can take the code used to create those elements and include it in the code for your own website.
Most importantly, don’t be overwhelmed by all the code you see if you are unable to parse it! Some websites will make use of more complicated code than others, and it will take some time to become comfortable with this language and its visuals. Feel free to “inspect” the pages of the [Your Name Here] website. Our code is likely to be simpler than that of a lot of other websites, and you can even change bits of the code to see how those changes affect the page. Don’t worry, none of it will be permanent! Our personal, easy favorite is playing around with the colors on the webpage. We have more in-depth prompts for ways to play with color in your site's design on our design ethos page.
Moving from a single web page to a website
In this tutorial, we have guided you through the creation of a single webpage using one HTML file, index.html. However, websites have multiple pages. For example, the template we have created is divided into four different sections or subheadings. You might choose to have each of these subsections as different pages rather than as information gathered on a single page. In order to do this, you would create separate HTML files for each page you want on your website (e.g., scribblings.html; my_surrounds.html; collaboration.html) with index.html acting as the HTML file for your homepage/landing page. The documentation on Mozilla Developer tools will show you how to link these separate web pages together into a single website.
Conclusion: Thanks for taking this journey with us!
Congrats on wading through this much material. We've given you all the components to create your own personal page. If you’re new to this like many of us were, you’ve learned a great deal already. Also, feel free to keep practicing and playing around with the templates we have provided you. This much new information can be overwhelming and although much of this can be difficult to learn, repetition works wonders. How you choose to style and layout your site is entirely up to you. While we may lean towards rebellion and magic, our real message is that whatever your authentic self might be, you should embrace that and let it seep into the confines of your personal website. When we scoured personal websites for inspiration, a wide range of styles captured our attention — ranging from the whimsical to the long-established academic aesthetic and everything in-between. Whether you want your site to feature publications and academic awards or recipes and astrological charts, there is no wrong answer. Now that you have the technical abilities and tools to build your own unique online presence, we hope that you feel empowered enough to take the leap and let the world experience the beauty of the life that you have chosen (personally, professionally, academically, or all of the above).